Why, where, and how to print your photos
December 18, 2018
There are many ways to bring your memories to life, and one of them is by getting your pictures printed! From big events to small gatherings, from large distance travels to fun days at a park. Those are the moments that you treasure, and I believe they shouldn’t just sit in your laptop or phone. I’ve been printing photos for myself and as little favors for my friends for a long time now. I strongly believe that by doing that I made my home a better place and my life happier. Either I hang them on my living room walls or keep them in some album that I look through only once a year, I give myself a chance to relive those wonderful memories I once experienced. And that alone makes me continue doing it!
That being said, I know a lot of people tried to get their pictures printed at some point but didn’t get the desired results. Prints looked cheap, muddy and worst that the digital version. I believe that’s because you can print your photos and you can PRINT your photos. In this blog post, I’ll give you some tips on how to get the most out of your prints!
My favorite labs to get prints from
1. I tried lots of different labs, from very very cheap ones to way too fancy ones, and I’m currently absolutely in love with Artificial Uprising! It’s a higher end print lab that specializes in fine art products (albums, cards, prints etc.). I usually order Every Day 4×6″ prints from them that go in sets of 10, 25 and 50. They use Mohawk Superfine Eggshell paper for those sets – thick matte paper, that looks and feels absolutely incredible!
You can also get large formats prints from them. For those, they use Archival Matte Paper – an FSC-certified, acid-free paper with a smooth, neutral-white finish
Set of 10 prints in 4×6” size is $12 + tax and shipping – $1.20 for 1 print + tax and shipping. Click here to see other size options and prices.
2. Another great and more affordable option is Photovision Prints. It is a professional film lab (where I also develop and scan my film) with great equipment and years of experience in the industry. They use Supreme Fuji Crystal Archive paper that is rarely used by cheap labs because of its higher cost, but it sure does look and feel luxurious!
They charge $0.39 per each 4×6” print + tax and shipping. Click here to see other size options and prices.
Disclaimer – there is nothing wrong with ordering your prints from Costco or some other local lab, it will surely be easier and cheaper. I personally have been doing it myself for years, but ones I tied a professional lab, I could never go back to it! It’s your right to decide what lab works best for your needs – a local drugstore one or a more expensive professional one. But there are still things you can do to ensure you get the best results possible! Keep reading to learn what those things are!
Do not use the lab’s auto-correction
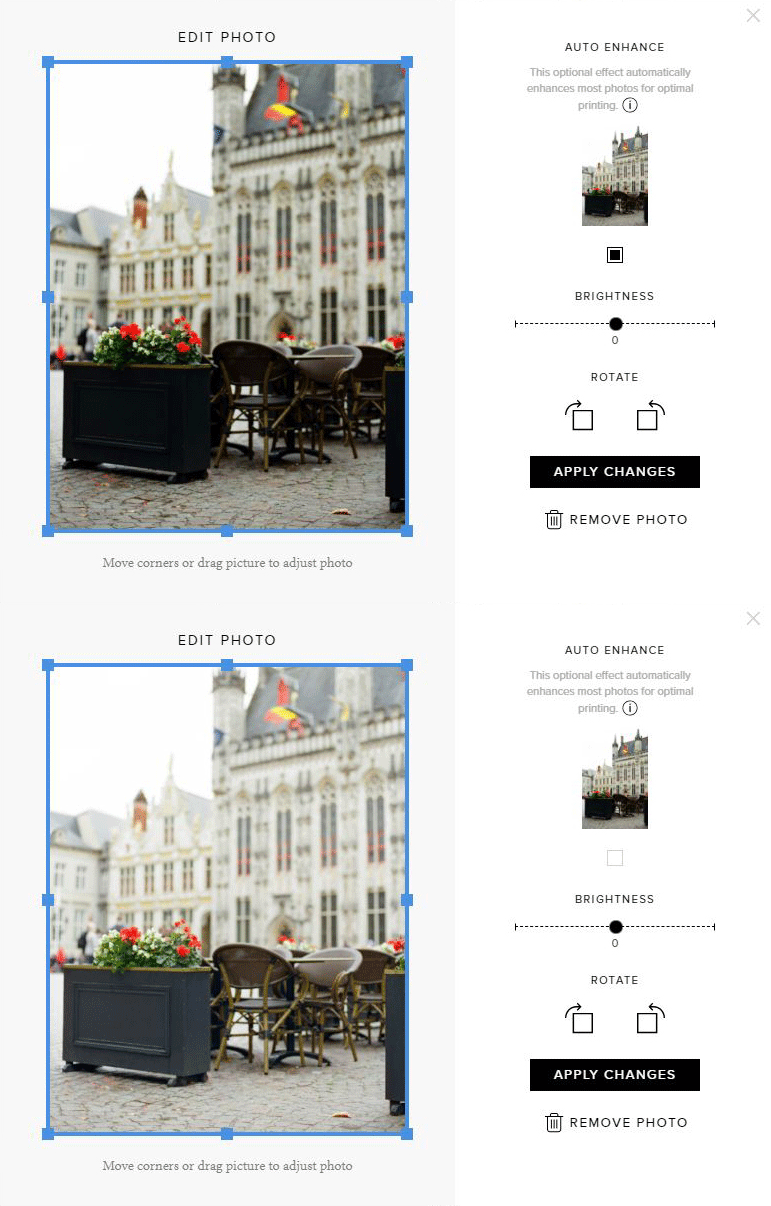
This is a biggie. When placing your print order online, some (not all) labs have an auto-correction check box, and here is the trick – sometimes it’s automatically checked without you even knowing it! That function changes the contrast and brightness of your images, and most of the time it looks truly terrible.
Here is an example of a correctly exposed image that got color-corrected by the lab’s software – image got too dark, lost all the details in shadows, colors now look too saturated and flat. Not the way I intended this image to look at all!
I learned it the hard way, by getting sets after sets of prints that looked dark, wired and too contrasty. Make sure to pay attention when placing your order, it’ll save you money and your images would look the way they actually supposed to.
Crop
Have you ever seen prints with white brims on two sides? Or photos that were cropped to make it fill the entire print? If no, just know that it happens!
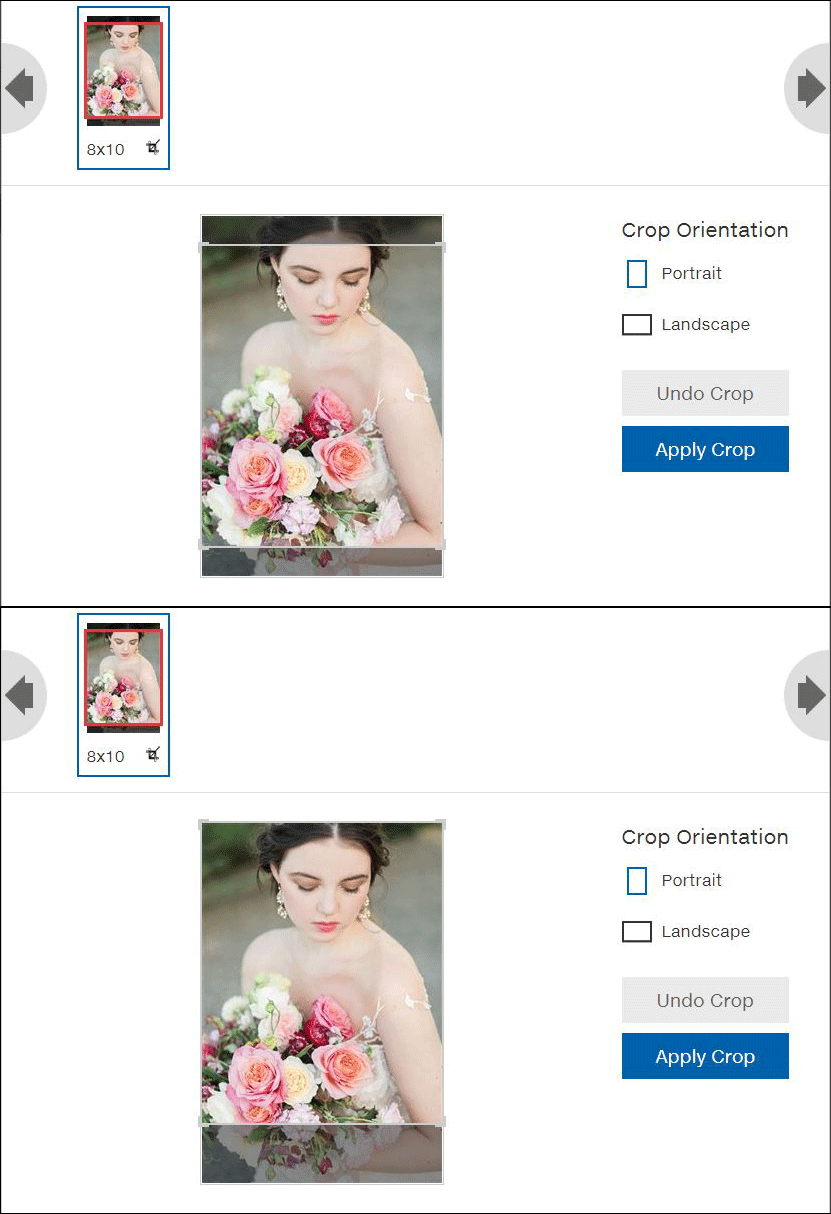
That’s because not all print sizes are proportional to your photos! Most modern cameras produce images in 4×6 proportion, which means if you order that photo in 4×6, 8×12, 12×18, or any other size that has the same proportions – you’ll get a great looking print and nothing to worry about. But if you’d like to order, for example, 8×10 print – you’ll either get the white edges or the automatic crop. To avoid either of those scenarios, check if you can manually crop your image to your preferences within the online software of your lab. No need doing it beforehand in some other app or software if you can do it when placing your order!
See the examples below to get a better idea of what I’m talking about and the difference between auto crop and how I would’ve cropper that particular photograph.
I hope this blog post would help you the next time you order your prints, or even inspires you to get your first ever set of prints! Please, let me know if you have any other problems or questions related to this topic and I would love to help!
follow along
film and digital wedding photographer in Seattle, Washington & wherever your love takes you
COPYRIGHT TETIANA PHOTGORAPHY © 2025 | SEATTLE, WASHINGTON

